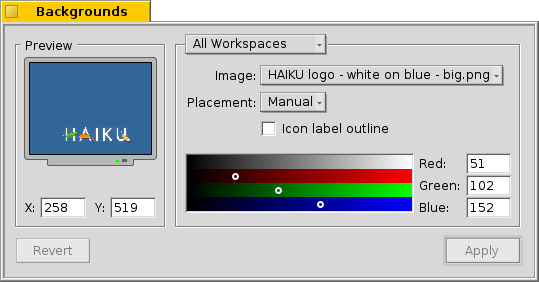
You can set a color or an image as background for every folder and the Desktop for every workspace.

The top drop-down menu specifies if your changes are applied to the current workspace, all workspaces, a specific folder or as default for every new folder.
Below that you can assign an image or select None if you want simply a colored background.
If you are using an image, you have to decide on the placement:
| Manual | lets you specify the coordinates. You can drag the picture around in the preview to the left or enter X and Y manually. | |
| Center | centers the picture in the middle of the screen. | |
| Scale to fit | enlarges the picture with no regard to its aspect ratio until it fills the screen. | |
| Tile | fills the screen by repeating the picture. |
If you are using an image you can activate Icon label outline which will put an thin contour around an icon's label.
If an icon label's actual text is black or white depends on setting of the color picker. A dark color sets the text to white, a light color to black. So, if you assign a very bright image to the background, you should also set the color picker to a bright color in order to have icon labels readable in black. (Or use the outline option above.)
The selected color is also reflected in the Workspaces applet, which ignores images as backgrounds.
| Revert | brings back the settings that were active when you started the Backgrounds preferences. | |
| Apply | sets your changes. |
